All posts by dan

QSO Party County Line Crossings Software

This Software program watches the input from a USB GPS receiver. When the detected location is withing a selected distance from the crossing, an alarm is indicated on the software window.

It opens a CVS crossings file with the following format:

County1-County2 hwy Lat, Lon

Example:

Waller-Grimes 6 30.2320960, -96.0546777
Grimes-Brazos 6 30.4184991, -96.1068440
Brazos-Robertson 6 30.7472344, -96.4567380
Robertson-Falls 6 31.1529698, -96.7324262

6 indicates Hwy 6, but could be any ascii value w/o any spaces. Note there is a comma and space between the lat and lon as coppied directly from the Google Maps waypoint.

You can use https://www.randymajors.org/countygmap Google Map to set the crossings. Just click on a county line and copy/paste into your crossings file.

This is a very early “beta” release, and could have some bugs. Please send feedback on anything you find, or would like changed. To n5tm{at}katytx.net

PJClient

I wrote PJClient many years ago.

PJClient is a web scraper. It monitors the N0UK PIng Jockey and EME pages.

N0UK only updates once every 10 seconds or so. PJClient watches the page and updates several times a second.

It then reformats the page and displays a table of active users.

Posting is much easier than using N0UK directly.

You can download the most recent version.

3D Printed Iambic Paddle

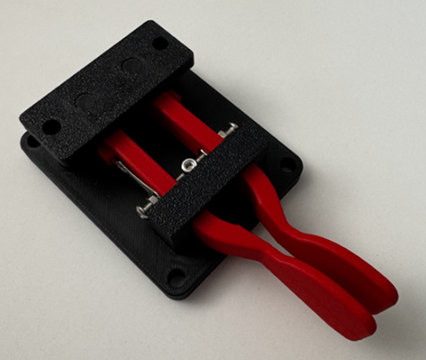
This Iambic Morse Paddle is ideal as a low cost entry level iambic key, or for portable/mobile operations like POTA. Simply attach it to a board or metal base for extra stability.

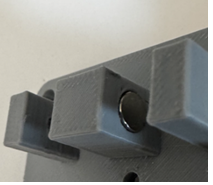
It uses opposing magnets instead of springs for the holdoff force.

A Kit is available in the Store. This kit includes all hardware, magnets and 3D printed parts.


Assembly Instructions (pdf download)

The 3mf file is available for download below.

23cm Dish Brackets

The dish is attached to the slew drive using 1/2″ aluminum mounting arms. Using (6) M10 bolts on a 70mm bolt circle. Fusion 360 Mounting Bracket Drawing

Slew Drive mounting arms.

The Slew drive base has a 100mm (6) M10 bolts. The bracket which attaches to the drill pipe is made from 7/8″ mild steel. Base Mounting Bracket Fusion 360 Drawing.

The bottom bracket is made from 7/8″ mild steel with four of the M10 holes to mate up to the upper bracket. The bracket has a 2.5″ hole to allow it to fit over the drill pipe. The hole was cutout using a mill rotary table. There are two M10 and two M6 holes tapped into the bottom bracket.

Septum Feed Mounting Bracket

Septum feed mounting brackets are made from 1/2″ aluminmum. 5/16″ bolts attach to the dish feed support arms, and hold the two brackets fixed. Set screws allow for the septum feed to be moved to focus position. Original concept for these brackets was a Fusion design by Petr AG6EE. I extended the ears a little and added the 5/16″ mounting holes. You can order a set of brackets in the Store.

Septum Mounting Bracket Fusion 360 Drawing

Feed Mounting Brackets

Choke/Reflector Mounting Bracket

The choke/reflector is an 18″ aluminum pizza pan. Conventional designs use and 18″ cake pan. They then insert a 3″ skirt inside the lip of the cake pan. In my testing, I can find no improvement in the signal when adding the skirt. So for now, at least, its a pizza pan choke/reflector which seems to add 1-2dB to the RX/TX performance of the septum feed.

The mounting bracket is made of 1/2″ aluminum. Two halves with clamping screws to squeeze the septum after the correct postion is determined. In my case, about 10mm from the feed opening. This bracket is sized to fit a solid 6″ aluminum extrusion style septum feed.

You can order this pair of clamping brackets in the Store.

Fusion 360 Drawing

Choke Mounting Bracket

I can provide STL files for all of these brackets. If you catch me in a goo mood, I can make them.

23cm Dish Construction

Fusion 360 layout of spars.

I used my small CNC Router to cut the spars for the 23cm dish. The material is 1/2″ baltic birch which, when painted, should hold up in exterior conditions for quite a while. Below is the cutout ready for CNC. Because my CNC is limited in lenght I had to cut the spars in two sections and then splice them together. There are two round center hubs. one for top and one for bottom.

I initially coverd the dish with Radiant Barrier which is available at Home Depot or Lowes and is used in the attic to cut down on heat load. After the initial tests were successful, I switched to 48″ wide 1/4″ galvinized mesh wire cloth which is available at ACE Hardware.

I used the full 48″ and set the middle about 3″ from the center of the dish which extends the outer edge about 8″ beyond the spars, making the diameter 2.4m. I used the galvenized wire which secured the roll of wire cloth to tie the sections together.

Radiant Barrier 2.0m diameter
Wire mesh 2.4m design

Biography

First licensed at the age of 15 in 1962 as WN5DTM. After passing the Technician license my callsign was WA5DTM. In 1976 I passed the Extra Exam and recieved N5TM which I’ve held ever since. Here’s my first logbook and my first contact in 1962.

As a novice, I built a 6L6 crystal oscillator which would make about 50W on 40m. As luck would have it, my first crystal was right in the middle of a foreign broadcast station. I finally got another crystall which was in a better location.

Through the years, I’ve experimented with various modes, but I still like cw. I’m a CWOps member, number 856, and often operate the weekly CWT contests. I have also been a CWOps Academy Advisor.

My favorite operating mode is CW, but I do dabble in the digital modes, MSK441 for meteor scatter and JT65 or Q65 for EME operation. Occasionally I’ll make an FT8 contact, but I may not even bother to log it, as I really hate FT8